
Tackling Questions Using Light Ray Diagrams
- AGrader Admin
- Oct 30, 2025
- 6 min read


Many students struggle with understanding how to correctly draw and interpret light ray diagrams, leading to confusion and lost marks in Science exams. From mixing up arrows to misunderstanding where real and virtual images are formed, mastering this topic can feel tricky. However, once you grasp the concepts behind how light travels, reflects, and forms images, these questions become much easier to tackle.
In this guide, we’ll walk through everything you need to know about drawing ray diagrams, understanding how light enables us to see, and how to confidently answer common Science exam questions involving light ray diagrams.
Table of contents:
What Is Light and Why Is It Important?
Light is a form of energy that allows us to see the world around us. Without it, everything would appear completely dark! There are two main sources of light:
Natural sources, such as the Sun, stars, and fireflies.
Man-made sources, such as electric bulbs, torches, and fireworks.
When we see an object, it’s because light either comes directly from it (if it’s a light source) or is reflected off it and enters our eyes. Understanding this simple principle is the foundation for learning how to draw a ray and how to interpret light ray diagrams accurately.

How Light Helps Us See
We can only see when light enters our eyes.
For objects that are sources of light, such as a lamp or the Sun, light travels directly from the source to our eyes.
For objects that are not sources of light, such as a chair or book, light from another source (for example, a bulb) reflects off the object and into our eyes.
This reflection of light allows us to see things around us — and this is exactly what we represent using a light ray diagram.
Understanding the Basics of Light Ray Diagrams
A ray diagram is a simple drawing that shows the path that light takes as it travels from a light source, reflects off an object, and enters our eyes.
When you practise how to draw light ray diagrams, you’ll start to notice patterns — such as how light always reflects off surfaces according to the law of reflection: the angle of incidence is equal to the angle of reflection.
Drawing Light Ray Diagrams to Show How an Object Can Be Seen
One of the more popular questions on light in examinations involves drawing light rays to show the path of light, which enables objects to be seen. Refer to the question below for an example:

So how do we draw the light rays to show how Xin Yi is able to see her bed?
In order to draw the light rays correctly, you will have to take note of a few key points:
When drawing a ray diagram, there are a few important rules to remember:
Light travels in straight lines. Always draw straight arrows when representing light rays.
Use arrows correctly. The arrowhead shows the direction of light travel — make sure it’s clear and not shaded.
Label clearly. Indicate the light source, the object, and the observer.
Use a pencil. This makes it easier to correct mistakes neatly.


And this is how we draw light ray diagrams to show how objects can be seen!
Explaining How a Person Is Able to See an Object
In exams, students are often asked: How then should we explain how a person is able to see an object (for example, part (d) of the question above)?
You can structure your answer as follows:
“Light from the light source travels in a straight line and reflects off the object into our eyes, allowing us to see it.”
Applying this to our example:
“Light from the lamp travelled in a straight line, reflected off the bed, and entered Xin Yi’s eyes, allowing her to see it.”
This simple explanation shows that you understand both the concept of reflection and how light travels in straight lines — two key ideas in drawing ray diagrams.

Light Ray Diagrams for Objects Not Within Our Range of Sight
Sometimes, an object cannot be seen directly because it’s not within the line of sight. In such cases, mirrors can be used to form a virtual image that allows us to see around obstacles — this is how a periscope works.

In the question above, we need to determine which positions of mirrors would allow Zack and Brian to see each other, as they are not within sight of one another.
To tackle this question, we have to recall that in order for Zack and Brian to see each other:
Light reflected off Brian has to be reflected into Zack’s eyes
Light reflected off Zack has to be reflected into Brian’s eyes
Let’s explore each option to see which positions of mirrors would allow Brian and Zack to see each other!
The orange arrows represent the direction of travel of light rays reflected from Brian.

In this case, only the mirrors’ positions in option 2 allow for the light ray reflected from Brian to be reflected into Zack’s eyes!
Let’s look at the direction of travel of light rays reflected from Zack now, represented by the red lines.
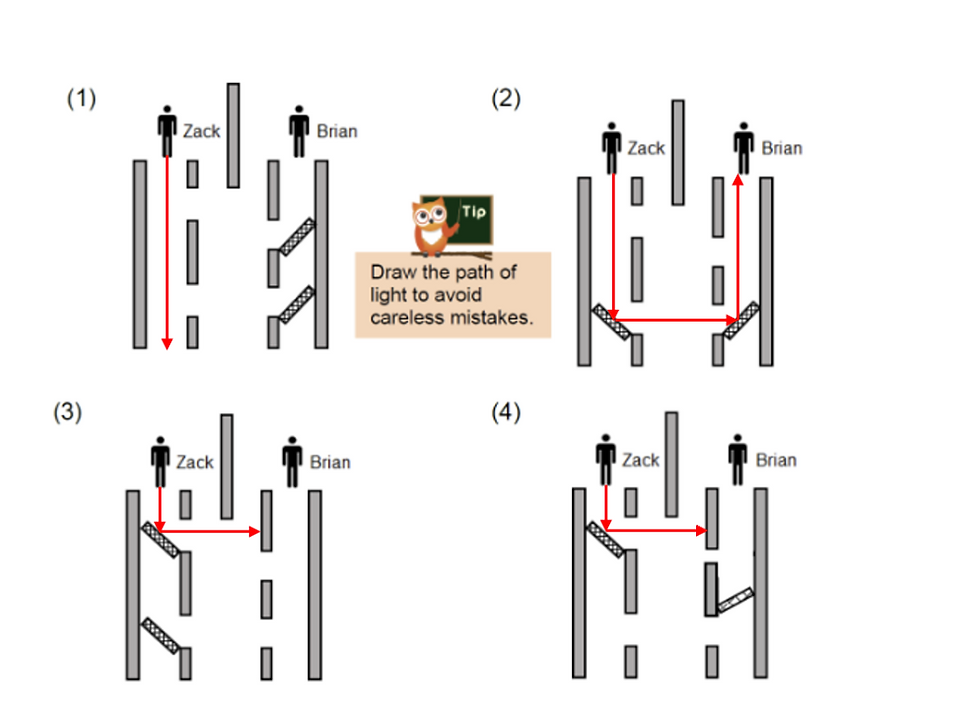
Similarly, only the mirrors’ positions in option 2 allow for the light ray reflected from Zack to be reflected into Brian’s eyes!
Common Mistakes When Drawing Ray Diagrams
Even students who understand the theory often lose marks for small, avoidable mistakes. Here are some common ones to watch out for:
Incorrect arrow directions – Always ensure arrows show the correct light path.
Curved lines – Light rays should always be straight.
Missing arrow heads – Without them, examiners can’t tell which direction the light is travelling.
Not labelling the focal point – Always indicate the focal point and principal axis clearly in diagrams involving mirrors or lenses.
Confusing real and virtual images – Remember: real images are produced when light rays meet; virtual images are formed when rays appear to meet.

By keeping these details in mind, you’ll not only draw accurate diagrams but also gain full marks for clarity and precision.
In conclusion, drawing light ray diagrams is not just about lines and arrows — it’s about visualising how light travels and interacts with objects to form images. Whether you’re determining how someone sees an object, identifying real and virtual images, or figuring out the correct mirror positions for a periscope,
understanding these diagrams unlocks a deeper grasp of how light works.
With consistent practice, careful observation, and attention to detail, you’ll no longer find light ray diagram questions intimidating. Instead, you’ll approach them with confidence, knowing exactly how to represent and explain the path of light clearly and correctly.
At AGrader, our Primary Science programme equips students with the skills and confidence to tackle even the toughest problem sums using proven heuristics and strategies. Fully aligned with the latest MOE syllabus and taught ahead of school, our lessons build a strong foundation in conceptual understanding, critical thinking, and exam techniques—giving your child the advantage they need to excel in the PSLE Science exam.
Through engaging lessons, real-exam practice papers, and our exclusive EverLoop Improvement System after-class learning & revision resources, your child will not only stay ahead but also develop a lasting appreciation for Science. Enrol your child at AGrader today and help them achieve PSLE success and beyond!
Join Our AGrader Community Today! (Free for all AGrader & Non-AGrader students)
Join our Telegram and WhatsApp channels to gain access to more study tips, free downloads, and much more for all subjects.
- WhatsApp channel: https://bit.ly/agwachannel
- Telegram channel: https://bit.ly/agtelchannel
Feel free to explore more related topics in this section:


Comments